Gryphon & Butterfly

Home

All about Philip
   Games I worked on
   My Miata
   My Norton

All about Gryphons

The Gallery
   Creating a Gryphon

MP3.com station

Cool Links

This is a combination tutorial and creation log of the steps I went through creating a gryphon model in Animation:Master.

I created this to give back to the community that helped me out tremendously as I learned this software. Hopefully you'll be able to learn from my mistakes and ideas.

Go to page... one | two | three | four | five | six | seven

OK, here's the plan. Ya gotta have a plan! I want to build the best 3D gryphon model the world has ever seen. Now... I've seen some fairly OK ones around, so this will definitely take some work. If you don't know what a gryphon is, then go visit the "All about Gryphons" section, over there on the left.

Now, since I have such a well thought out plan... this is going to be sort of rambling and stream of conciousness - I'm making this up as I go along, so you get to enjoy my screw-ups as well as my failures. Er... I mean, magnificent successes!

The general flow will be to build the basic body, creating the legs and wings seperately. Then we'll break open some holes in the body, and merge the appendages in.

The head is going to get some special attention, as I want a really good looking face, with openable mouth. Raptor eyes are fixed - they don't turn at all - so we don't have to worry about anything but a fairly simple eye structure... but it's gotta look good! And the beak needs to be openable, and have a modestly mobile tongue.

And that's about as far ahead as I've thought! Let's see if it's far enough.

Basically, I found a couple of good reference images, and scanned them in, cleaned off the backgrounds, sized them to something I thought was roughly good, and then saved them off as targa (.tga) files.

Then, load them into A:M as images - just double-click the images tag, add 'em. Notice I left the lion's foreleg showing, because the eagle's legs would be way too far back, in relation to the chest, and I wanted an easy reference point.

Next, put them into the model as rotoscopes - rightclick anywhere on the model, select 'new', then 'rotoscope', and choose one of the images that you loaded in the previous step.

Position and size them to your liking. You may then want to make them un-selectable,so they don't interfere with your model-making. Do so by simply clicking the hand icon, over on the left pane.

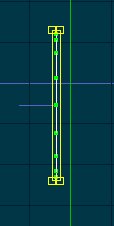
Next, make a circle to work with.
Make sure you're in the front view, by pressing '2' on the numpad
Click the "Add" button, or press 'A'.
Draw a short spline.
Select one point on the spline
Hit the 'lathe' tool
Voila! A circle!

Now... an important note here - you can change the number of points generated by the 'lathe' tool - it's in the preferences panel somewhere. I went with a really high count (16), but I'm not sure it needed quite so many. 12 would probably have sufficed.

Circle, from the side.

Rotoscope turned off, for clarity

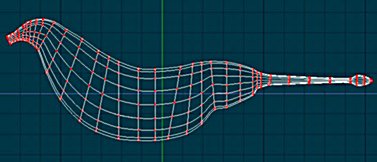
Now, you select that entire circle we made above, and press 'e'... quite a few times. I find it easier to 'extrude' once, resize and rotate as seems appropriate, and then 'extrude' again. Sometimes, though, it works to just stuff a pile of 'em out there.

Then, spend some time resizing the circles, and positioning them so they line up with your rotoscope nicely. The easiest way to do this is to click somewhere on the circle, then press the comma (',') key. That selects the entire spine, making it very easy to resize and rotate.

Notice how the tail extends straight back from the body? Not only is this easier to do at this step, but it will make adding the bones much easier, later.

Now, we need to make a hindleg. For convenience's sake, we'll just grab one circle out of the main body, press control-C to copy, then control-V to paste it. Grab that up, and move it somewhere convenient, like... over the image of the leg on the rotoscope.

Select the object, then press 'H' to hide everything else. This'll make it a lot easier to work on the leg, without the body confusing things. As before, extrude, resize, and rotate.

Now, shift to the top view (numpad 5) and move the leg over to the side, so it won't be in the middle of the body. That would be awkward. Notice in this image that the top loop isn't flat, it's rotated over - this will help it attach to the body, when we're ready for that.

And here's the whole thing, after pressing 'H' again, to un-hide the body. You'll probably want to fiddle with the positioning, to make sure it's just right.

And here it is, from the top. About this time you may notice that... wow... it's really excessively round. Yes it is. Animals aren't tubes. So this is when you would start making your best guess at how much to narrow the chest and belly. Just grab a few points, and move them in toward the spine.

Squeezing the hindleg in is a little tricker - I suggest selecting the body, then pressing the 'lock' icon, so that you can still see the body, but can only manipulate points on the leg.

I prefer to do the moving with the arrow keys, because you have more control over it, and can make sure you squeeze both sides in the same amount.

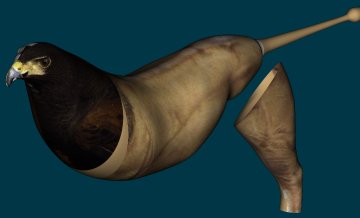
Here's where those rotoscopes really pay off! Because we're going to re-use them, as a preliminary skin! It won't be good enough for the final, but it's sure good enough to impress your friends. :>

Don't worry, I'll go into detail about how to do this later on, I just did it to make myself feel better about the whole process. :>

Now, here's a close-up of the flute-beaked gryphon. We're going to cut that set of control points that I've circled, then we're going to break the spline there. Of course, there's actually two splines - the left and right one, so you'll select, press that 'k' key, then select again, and re-'k'. Notice we're not cutting the center line, but down slightly, because the upper beak has slightly more complex geometry, and it's more visible, so we want the extra space to work with.

This will produce something I forgot to take a picture of, but you'll see it yourself. Now, the half-flute I've got here isn't long enough for what I've got in mind, so I wound up marking the last set of CPs and extruding a couple more times. Basically you want enough to wrap this all back around, and form the inside of the beak.

OK... you may want to click that image over there, and take a look at it for a bit. What happened there was much resizing and rotating, to get the outside edge of the beak done. Then came the part that's a little tough to make out. I marked the inside of the upper beak and the 'locked', so they shine out better... and in the lower beak the 'inside' hasn't been pushed down all the way yet.

So, can you see how that happened? I just grabbed a splinefull of CPs, then dragged it up into the beak, and did more scale & rotates, so it magically became the inside.

Now, as you can tell, the inside doesn't go nearly far enough yet, so I'm going to grab the ends and extrude a few times, to form what will become the back of the mouth, and then close down to become the throat. But it's not that easy... ohhhh no. First we need to join the inside and outside, to form a proper edge to the beak! And that's a little trickier than you might think.

So... here's where we are, now!

You can really see what a difference even that temporary decal makes! Just compare the upper image, showing the side that has the decals, against the lower one, which shows the side without.

A great 'skin' can make up for a pretty mediocre model, in a lot of ways. And the best model is only going to be so-so, without a good skin. However! There's a lot of things we can do, here. I'm a wretched 'paint' artist, but I can smudge and copy and move and manipulate quite well.

Animation:Master also has some neat tricks in terms of procedural textures, and with a bit of time and effort, I'm betting I can come up with some that might work pretty well. We'll just have to see!

But for now... this is a good pausing point, and plenty big enough for one page. I think we'll get into the details of fixing up that beak, and building the foreleg, on the next page. Which will happen later in the week.


Go on to page two.


Send E-mail to Philip, but remember to remove the REMOVE. Damn spam-monkey-bots!