All about Philip
Games I worked on
My Miata
My Norton
The Gallery
Creating a Gryphon
|
This is page seven of a combination tutorial and creation log of the steps I went through creating a gryphon model in Animation:Master. |
|
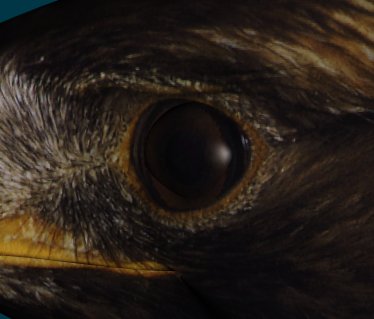
Whee! Eyes! Mahahahah! This turned out to be so easy. Just a quick 6-point spline, joined up like you see here. A quick extrusion to give some depth to the lid. Then, a quicky 6-point sphere, munged around a little bit until it seemed to fit the curve of the face (this is a top-down view). Now, I can tell you straight off that the geometry for this isn't quite perfect, but... it's pretty close. Raptor eyes have a very strong foreward-facing angle. Also important to note - they can't actually MOVE their eyes in the sockets more than a couple of degrees! This is part of what gives them their incredible eyesight. And, last but not least... give that eye a little shine! I went with a specular size of 73%, and a specular intensity of 40%. Now, since I happen to have this nice picture of a raptor face, which also happens to have a raptor EYE... I just hid everything but the eye, and applied the decal. Slick! |
|
|
So.... are we done? Not by a LONG shot! First, I want to go all over the entire model and make sure I'm really happy with everything - little tweaks of the curves here and there can make a big difference. I won't trouble you with what I do... do your own! It's gotta look right to you. However... at some point here comes the Big Step - a Copy / Flip / Attach. That's when our gryphon suddenly becomes bilaterally symmetrical. Seeya then! |
|
What? Back so soon? Ack! Uhm... well. Let's see. This whole C/F/A thing is kind of a neat trick. First thing you gotta do is remove the half of the model that doesn't have legs and wings attached. Now, you can't just massively select the CPs and delete, because the spline itself will continue, and that's... not OK. First thing you need to do is break the around-the-body spline, by selecting a piece of it and pressing 'k'. So, in a top view go to the very tail end, and zoom WAAAAY in. Make sure the spline that runs along the very center of your model is almost on the Z-axis line. Just a teeny tiny bit to the right is ideal. If it's not, drag-select the entire model and move it until it's in the right spot. Now, again at the very tail end, break the trailing edge spline, somewhere on the left side, then drag-select all the CPs on the left except the very center ones, and hit delete. And there you go - the right half of the tailtip. Repeat this process on up the body, all the way to the head. Uhm. Hmm. There's a problem with the head. The inside of the upper mandible doesn't have a spline along the centerline. That's a problem, because the CFA won't work right unless there is. I think we'll just add one - a little tedious, but not too bad. Just grab the inner mouth part (did you remember to make a group out of it, way back when? This is when that comes in REALLY handy!) and hide everything else. Select a spline section that's missing it's valued CP, click the 'Insert CP' button (or press 'Y'). There's a new CP. Whee. Now move on, creating new CPs in the splines that lack them. One annoying thing? AM doesn't put the new CP in the center of the space, it puts it about 1/4 of the way. So... you'll have to move them all to the center. When you're done, create a multi-CP spline (with shift-A), and fill in. This is pretty straightforeward. Oh! Wait! Make sure you make that spline one CP too long, and let it dangle off the tip... and then do the same thing with the outside part of the beak, so that you can clip those trailing ends off, and get a nice sharp tip. And yes, this is going to be an all-text entry. I suck. But... I'm not real sure that any images would actually help. Basically, this is a really tedious process around the more complex areas. You may have to tweak the positions of the CPs that remain, too, so they line up on the right spot on the Z axis. |

|
OK, OK, here's a picture of the head (which was unquestionably the hardest part) all cut in half. Sort of disconcerting, really! Now that all the hard work is done, you basically just drag-select the whole model, making sure to get all the feathers and such, then ... SAVE IT! Make a backup! OK, done that? Now, right-click on the selected group, and choose "Copy Flip Attach", and... go get a drink, or something. It'll take a while. But when you come back... tadahhh! Your gryphon is now bilaterally symmetrical! Oh, look! Damn! There's that annoying little gap in the beak... or that stupid toe you forgot to fix, or some other piddly detail you'd really rather not have to do twice. Well, luckily, you saved a backup! Just revert to that, fix everything up nicely, and then CFA again, and you've saved yourself a lot of work! Now, as it happens... I'm still dreadfully dissatisfied with the front claws, so I'm going to spend a couple of days working on those. |