All about Philip
Games I worked on
My Miata
My Norton
|
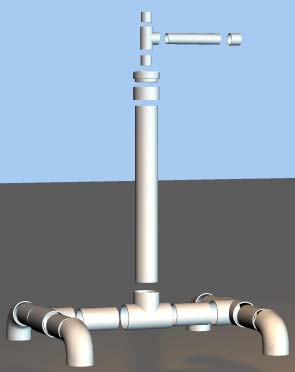
Here (at last) are the plans for a PVC birdy playstand that I built, for our Cockatoo and Pionus parrots. Please, feel free to copy this design! That's what it's up here for! If you want to credit me somehow (give your birdy a scritch and tell them where it came from?), I'd be happy. If you like the design, or have suggestions for improving it, and let me know, I'll be even happier! |

|

|
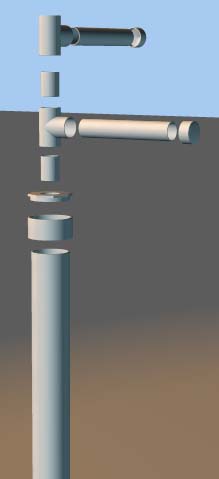
This is the top of the stand. Working from the bottom up is the 2" pipe, 3 feet long. Then comes a sleeve (for joining two 2" pipes), and on top of that is a 2" to 1" adapter. Then we start building the actual 'play area'! The play area is up of 1" T connectors stood on end, with a short (3 inch) chunk of 1" pipe between to join them, and a longer piece of 1" pipe sticking out for the perch - Ours are about a foot, on average. If you want, you can try mixing in a couple of 3/4" pipe for the perches, too - they make a T adapter that's 1" on the long side, and 3/4" on the short side. Knowing our bird's love love of eating anything they can, I put end-caps on all the pipes. You should, too. |
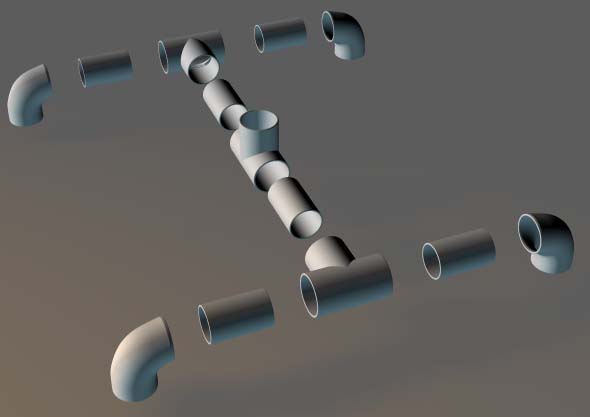
This is the bottom, and the most tricky part! Making sure you get those feet parallel is very important, or you'll have a wobbly stand! I tried making this with endcaps instead of 'feet', and it just didn't stand up very well on carpet. I have an idea about a way to fix this, and I'll list it in the instructions. As you can see, it's basically a whole pile of 90o 2" joints, with some short chunks of pipe to connect them. 
|
|
|
Materials Note: I use " for the pipe thickness, and inches to indicate length. For the bottom:4 - 2" 90o fittings. 3 - 2" T fittings 6 - pieces 2" pipe, 8 inches long. 1 - piece 2" pipe, 3 feet long 1 - 2" connector 1 - 2" to 1" adapter
For the top: |
|
|
Instructions First, put together the feet - glue one 3-inch long piece of 2" pipe into each of the 90o connectors. Next, glue one 3-inch piece of 2" pipe into each of the 'long' sides of one of the T connectors. This will form the joint to the vertical piece.
This next step needs to be done pretty quickly, before the glue sets!
There, the hard part's all done! I left the long vertical piece un-glued from the bottom, so it's easy to break the whole thing down for transport, but you may want to glue it in. The rest of it's pretty self-evident from the pictures - just go crazy putting in different sizes and lengths of pipe, as you think your bird will enjoy! Don't forget to finish the top off with a bit of 1" pipe and an end-cap, or at least a bit of wooden dowel, or they'll get up there and chew!
You might try making a short horizontal perch, then adding a T to that, with two more short perches, for a nice long T-shaped one.
|
|